COR-577DBS:
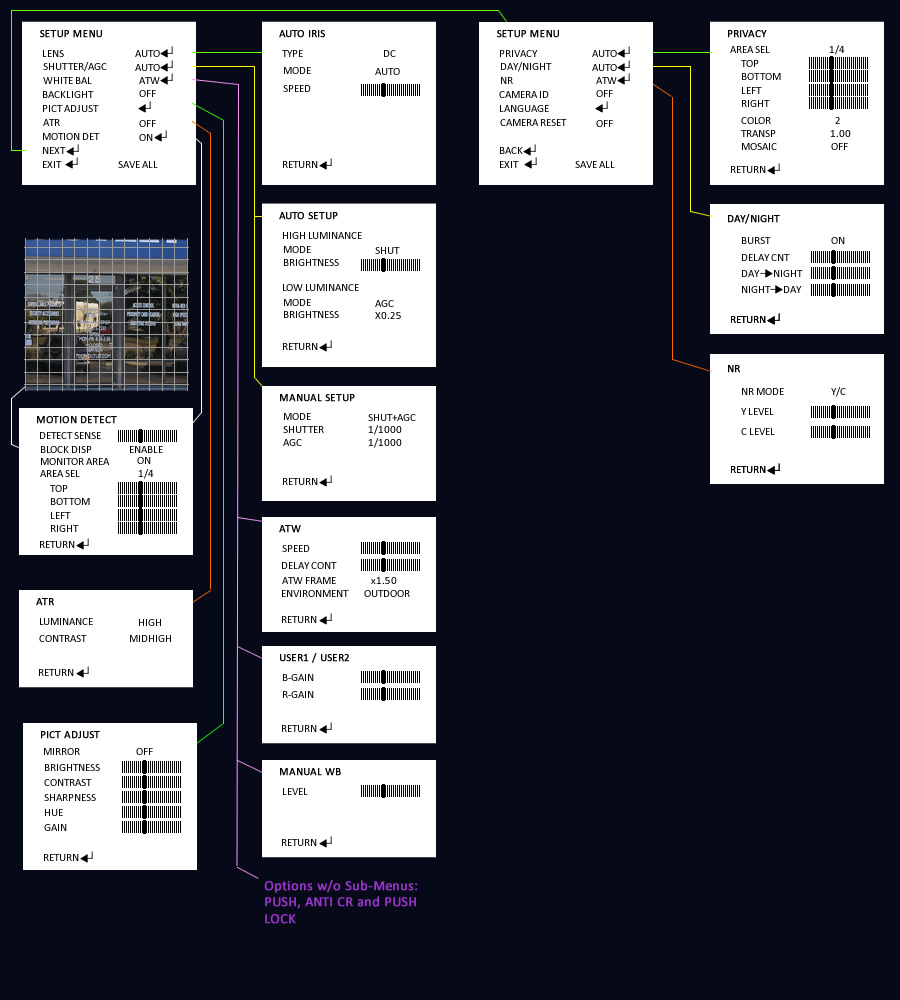
OSD Menu Options: COR-577-Series DomeSetup Menu
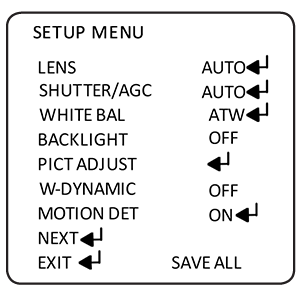
LENS - MANUAL/AUTO. Not implemented in this model. Setting to MANUAL or AUTO makes no difference.
SHUTTER/AGC - Shutter and auto-gain control features. Shares interaction with LENS settings to some extent.
WHITE BAL - White balance options. Many options and many settings are available, including legacy white balance and advanced RGB color saturation.
BACKLIGHT- Backlight compensation settings, including advanced high light compensation.
PICT ADJUST - Contains a sub-menu that presents the standard video adjustments common to most CCTV cameras.
W-DYNAMIC - Advanced Wide Dynamic Range enhances color and contrast in areas sandwiched between areas of high and low luminance. Sometimes called ATR.
MOTION DET - Motion detection.
NEXT - Presents the next menu, explained below and to the right.
FUNCTION Menu
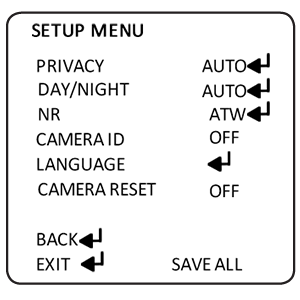
PRIVACY - Takes the user to the PRIVACY sub-menu, explained at right.
DAY/NIGHT - Determines how the camera handles transitions between day mode (color) and night mode (black and white).
NR - Noise Reduction mode. Sub-menu explained at right.
LANGUAGE - Many selections available including English, Spanish, French, and more.
CAMERA ID - Traditional method of labeling the camera with an on-screen name/label.
CAMERA RESET - Puts the camera into factory default settings, invoking PREPRO, which pre-programs all values to optimal setting for most surveillance environments.
BACK - Returns to previous menu (SETUP).
EXIT - Saves settings and exits menu structure.
Setup MENU EXPLANATIONS
Lens Selection Options
The LENS menu selection is not implemented in this model since it does not contain an auto-iris lens. This explanation is provided for the sake of completeness.
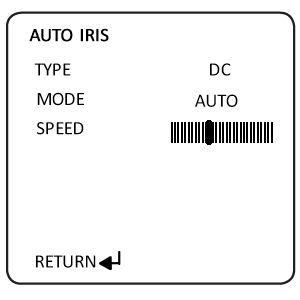
You can select one of two options under LENS - MANUAL or AUTO. If you select AUTO you can reach the sub-menu at left. You can select DC or VIDEO as a control signal.
MODE gives you AUTO, OPEN or CLOSE. The last two options will lock the iris in the indicated state. AUTO lets the iris function automatically.
SPEED governs how quickly the iris, when under AUTOMATIC mode, reacts to changing light conditions.
NOTE: LENS options are not implemented in The COR-577 camera.
Shutter/AGC Selection Options
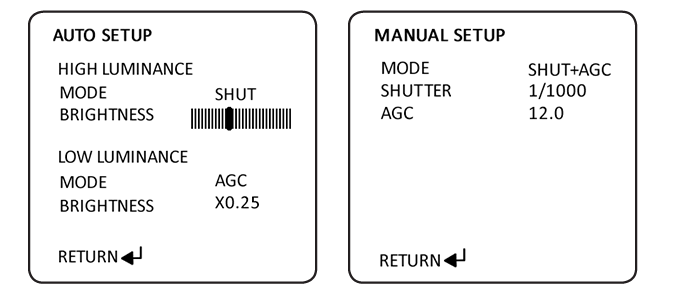
This menu setting gives you up two sub-menus, one for automatic gain settings settings and one that effects shutter settings.
AUTO SETUP lets you change how the camera reacts to high and low luminance using auto-gain settings.
HIGH LUMINANCE: Compensates the picture when very bright images are in the field of view. This could be a brightly lit scene or a stark white object - both situations create high luminance. The MODE setting interacts with the LENS setting, described above. When LENS is set to MANUAL you can adjust only the BRIGHTNESS bar (numeric range of 1 to 255).
Note: When LENS is set to AUTO you can adjust the HIGH LUMINANCE MODE as well as the BRIGHTNESS bar. MODE options instruct the camera to compensate with the AUTO IRIS or the SHUT+AUTO IRIS (shutter and auto-iris). In this case the BRIGHTNESS bar skews the compensation accordingly.
The MANUAL sub-menu gives you the ability to manually set the electronic shutter (in a range of 1/60 second to 1/10000 second) and auto-gain control in 6db steps. This adjustment can be useful in low light settings but being manual, it will not automatically adjust if the scene gets brighter for any reason.
White Balance Options
This camera provides a wide variety of ways to effect white balance. These multiple methods make this camera extraordinarily flexible, increasing the range of surveillance environments where this camera can be used. Some options include sub-menus,some do not. The whole list includes the following:
- ATW: auto-tracking white balance (sub-menu)
- USER1 and USER2: individual settings that can have unique R/B/G levels (sub-menu for each)
- MANUAL WB: self explanatory (sub-menu)
- PUSH: not implemented in this model
- ANTI-CR: anti-color rolling (no sub)
- PUSH LOCK: requires the user to present a color (generally white)to the lens for "capture". White balance compensation is then based automatically on that captured color.
ATW - Auto-tracking White Balance
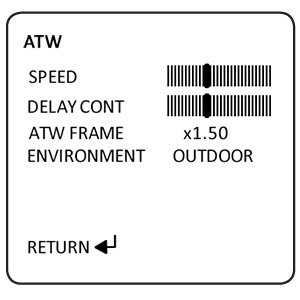
Florescent light, sunlight, incandescent light and other light sources have different color temperatures. Auto-tracking white balance makes sure that as light color temperature changes white objects are reproduced accurately. The additional controls in this sub-menu (SPEED, DELAY CONT, ATW FRAME) can be used in environments that present unique lighting challenges, such as a public transit platform that is illuminated by combinations of sunlight, incandescent light and florescent tubes.
ENVIRONMENT: INDOOR or OUTDOOR. Use this control to select a baseline color temperature. Setting it to INDOOR tells the camera the dominant color temperature will be that of artificial lighting. OUTDOOR selects sunlight as the baseline color temperature.
USER1 & USER2
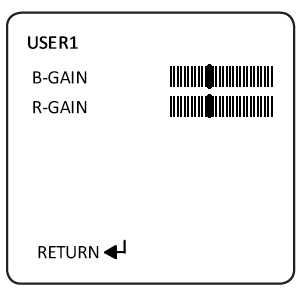
This sub-menu lets you make major changes in color saturation. B-GAIN controls blue, R-GAIN controls red. Green automatically adjusts as you change the blue and red settings so no specific G-GAIN adjustment is provided. The OSD menu provides 2 menus (USER1 and USER2 - both work the same way) so 2 settings can be stored.
Vision impaired (color blind) users may find USER1/USER2 sub-menu settings helpful. These settings can also be helpful if you are monitoring an area that is always saturated by a single color of light, such as entertainment venues, bars or taverns, etc. Some people may attempt to use such areas of unusual color for their own purposes - these adjustments can negate such attempts.
MANUAL WB
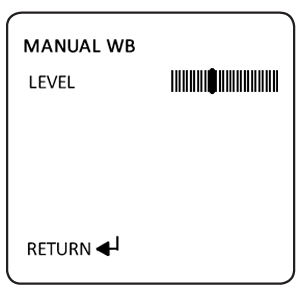
This setting is the basic legacy white balance setting that has been programmed into CCTV cameras since the setting was first created. We added the ability to force some overall compensation using a level adjustment.
Upon power-up, the camera will acquire a white balance value from the whitest object in its field of view. When it reproduces the color white it will refer to this value regardless of changes in color temperature or any other factors. The slide bar can be moved from extreme left (level = 0) to extreme right (level = 255) to make manual compensation.
Options without Sub-Menus: PUSH, ANTI-CR and PUSH-LOCK
PUSH is not implemented.
ANTI-CR (anti-color rolling) is essentially the legacy white balance with anti-color rolling technology - if you use the MANUAL WB setting and the picture exhibits intermittent color bars rolling across the screen try using this setting.
PUSH-LOCK is a white balance method that requires user intervention. To set white balance using PUSH-LOCK, point the camera at a white object, make sure it fills as much of the screen as possible, then click the mini-joystick. The camera will reproduce colors using the white color you presented as a baseline. While it can be very accurate this white balance method is best left to professional photographers who are adept at color adjustment and reproduction.
BACKLIGHT Options
There are 3 settings for backlight compensation options and no sub-menus. Available settings are OFF (no compensation), BLC (Back Light Compensation enabled), and HLC (Back Light Compensation with High Light Compensation).
HLC - High Light Compensation - is a method of backlight compensation that also masks areas of intense light. Some thieves and unsavory individuals have learned that you can momentarily disable some CCTV cameras by shining bright lights directly at the lens. HLC is one of several methods developed to combat this threat. When HLC is active it will mask the source of the bright light with a dark shape, thus allowing the area to the side of the light source to be viewed and recorded. People who think they are concealed in a halo of hazy white light will be revealed.
PICT (Picture) ADJUST Options
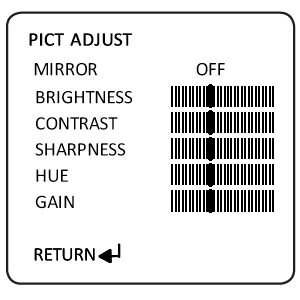
This sub-menu contains common user controls associated with video picture adjustments.
MIRROR - ON/OFF. Flips the video picture left/right.
BRIGHTNESS, CONTRAST, SHARPNESS, HUE and GAIN - All of these settings are self explanatory. The slide bars can be adjusted from a numeric value of 0 (extreme left) to a value of 255 (extreme right).
W-DYNAMIC Options
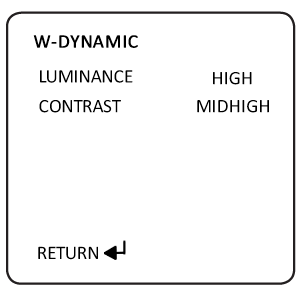
W-Dynamic is an advanced form of wide dynamic range (sometimes called ATR, or Advanced Tone Recognition) is an Effio™ technology video processor enhancement designed to accurately reproduce color tones in a scene that includes areas of high and low brightness.
Color tones are sometimes washed out or shadowed in non-Effio equipped CCTV cameras when the scene includes areas of high and low luminance. Standard video processors simply can not adjust fast enough to accurately reproduce subtle tones, including skin tones, in that type of lighting situation.
LUMINANCE - This setting will control how bright areas of high luminance appear without effecting the areas of low luminance or dark areas of the scene. Options are MID, HIGH, or LOW.
CONTRAST - This setting changes the amount of emphasis to areas that have subtle changes of tone or contrast. Higher settings bring out subtle changes in tone more clearly. Available settings are LOW, HIGH, MIDHIGH, MID and MIDLOW.
MOTION DET Options
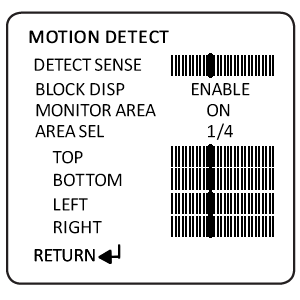
There are two ways for users to set up motion detection.
DETECT SENSE - Slide bar sets sensitivity of motion detection to 0 or 255 (maximum sensitivity).
BLOCK DISP - Settings are ON, OFF and ENABLE. When ENABLE is selected, the user will see a grid pattern on screen. Using the mini-joystick, each square on the grid can be selected/deselected for motion detection. When finished move the cursor to the lower right corner, click and hold, and the grid will disappear and this menu will return.
MONITOR AREA - This option works with the AREA SEL selections, described below. It enables the "areas" or turns them off.
AREA SEL - Lets you select up to 4 rectangular sections (1/4, 2/4, 3/4 and 4/4), defined by the TOP, BOTTOM, LEFT and RIGHT slide controls.
PRIVACY Options
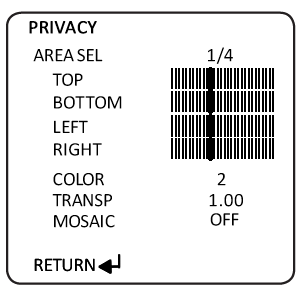
This camera allows sophisticated privacy mask creation and control. You can make up to 4 separate privacy masks of different sizes, shapes, colors and qualities.
AREA SEL - 1/4, 2/4, 3/4 and 4/4 - Like the AREA SEL described under MOTION DETECTION, above. Refers to a different privacy mask under your control, defined by TOP, BOTTOM, LEFT & RIGHT slide controls.
COLOR - Mask color red, green, blue, black, white, purple, turquoise and olive. These colors let you identify each privacy mask you create.
TRANSP - Privacy masks can be completely opaque or transparent. Use this control to set level of transparency.
MOSAIC - This creates a mosaic pattern in the privacy mask region. This can be useful if you want to mask an area for privacy but still monitor it for movement.
DAY/NIGHT Options
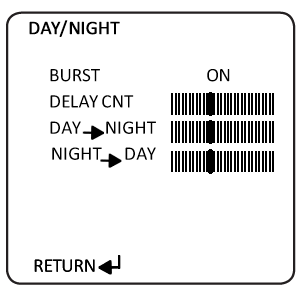
This sub-menu governs how the camera handles color and how it changes between day and night mode and back.
BURST - Alters the color burst information passed to the video monitor. If your monitor is showing poor color reproduction (or no colors) and you are using long runs of cable, changing this setting from OFF to ON may improve the situation.
DELAY CNT - Controls the delay before the camera switches from one mode to the other (color mode in daylight, black-and-white mode at night when infrared is on).
DAY->NIGHT - Determines the level of light necessary to switch from day mode to night mode.
NIGHT->DAY - Determines the level of light necessary to switch from night mode to day mode.
NR (Noise Reduction) Options
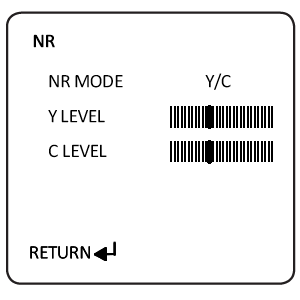
You can set noise reduction values on luminance and chroma components of the video signal.
NR MODE - Select Y/C to adjust luminance and chroma, C to adjust only chroma, Y to adjust only luminance, or OFF for no adjustments. The Y LEVEL and C LEVEL adjustment slide bars will appear or disappear depending upon your selection. Their behavior is self explanatory. The display will show a numeric value when you adjust the slide bars, for your convenience.
CAMERA ID
This sub-menu lets you name the camera using standard alphanumeric characters and symbols. You can also position the camera name anywhere on the screen. CAMERA ID - ON turns the name on, and CAMERA ID- OFF turns it off.
LANGUAGE
Several languages are available including English, Spanish, French, Portuguese, Italian and several Asian languages and dialects.
CAMERA RESET
Reset camera to production default values. This camera has the PrePro feature, so it is good to note that a simple RESET will place the camera in an optimal operating state with all selections and sub-menus pre-programmed for user convenience. Testing has shown that these settings are perfect for the majority of normal environments. Used judiciously, this feature can be a powerful time saver for installers and maintenance technicians.
Back, Exit and Save All
BACK - Returns you to the previous menu.
EXIT - Takes out of the menu structure completely.
SAVE ALL - Saves settings. You must click this setting to save any options you changed in this menu or the camera will lose all your changes if it loses power.
OUR FOCUS IS YOUR PROFIT
Cortex Security Solutions
OUR FOCUS IS YOUR PROFIT | Cortex Security Solutions

CORTEX Inc. Copyright 2025 -
All rights reserved