Training Page:
DIY IP Camera Installation
DIY IP Camera Installation Notes for the Beginner
If you're new to security cameras and you go to a store you end up having a curve ball thrown in your direction almost immediately (well, depending on the store you go to the first curve ball could be deciding wether or not your really want that big box of 144 bags of chili cheese Doritos or some other savory snack food - but once you get past THAT decision ...). Along with the boxes of promising "all in one solutions" and the inevitable wireless cameras telling you how easy it is to install them and get them running without doing hardly anything at all, you'll probably run into an IP security camera at some point.
You've probably done some preparation. You probably have read about bullet cameras and dome cameras and PTZ cameras (oh my), and you may have investigated the difference between CMOS and CCD video sensors, and you may even understand nuances like 1/4", 1/3", C- and CS-mount lenses, slow shutter, infrared, and more. And hopefully you know what the difference is between an IP camera and a standard (traditional) security camera (or analog security camera). This short article addresses a missing piece of the pie that many DIY security camera installers don't really think too much about until the choice is shoved in their faces.
Exactly how do I connect an IP security camera, and how does installing them differ significantly from the standard (traditional) style security camera? All of the packages say "Easy Installation", but you may be suspicious about anything that demands that you become versed in the mysteries of IP protocol and network topology.
I'll assume you know how to connect a standard security camera and create a basic surveillance network using traditional products. (Review: Connect cables to camera. Connect cables to power supply and video monitor. Turn everything on. You're done.)
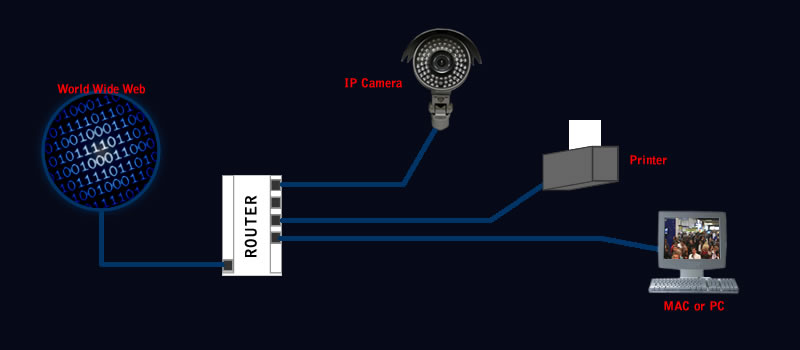
Setting up an IP camera is not that much more involved. Take a look at the figure below.
If you remove the IP camera from the figure, you have a basic home network. Put the IP camera back in the picture and you have a basic home surveillance network with an IP camera. Run the necessary software on the computer and find the IP number for your IP camera (the software is likely advanced enough to search and identify the correct IP numbers for your camera if you purchased from a reputable source). In fact, if you click the picture above you will be taken to the MAX-IP280 product page, which is a perfect starter IP camera for DIY'ers.
We hope you found this informative. Have an idea for another DIY tech article? Let me know what you think. You can contact the author directly at nathan(@)cctvco.(com.) Remove the braces of course (used here to prevent 'bots and spammers from harvesting my email address.
Cortex manufactures the
all are fine megapixel IP camera products, but the MAX-IP280 is a perfect IP camera beginners. Used in the right place, placed by an installer that knows what they are doing, these cameras can save your client money and improve their business and/or personal security.
More Technical Articles
- If you enjoyed this article you may enjoy these.
- Megapixel IP Cameras
- Enclosure | Ingress, NEMA Ratings Training Article
- Understanding Infrared CCTV Cameras
- Understanding (AES) | Slow Shutter
- Product Details Matter | Quality What the Eye Can See
OUR FOCUS IS YOUR PROFIT
Cortex Security Solutions
OUR FOCUS IS YOUR PROFIT | Cortex Security Solutions

CORTEX Inc. Copyright 2025 -
All rights reserved
